Wednesday, November 28, 2012

Friday, October 19, 2012

Some Catch Up

I've been super busy as of lately and been doing quite a bit of traveling so I've had very little time to post on some of the things I've made lately. So to do a little catch up here's a few photos of some of the things I've been doing.
 This one is a head band I made for my niece. She's going to be a cat for Halloween and as you can tell she's still a newborn. So for this I just used a black Infant stretch head band and then I used felt to make ears and a bow and I simply hot glued them to the headband. The only thing with making it this way is you have to be careful to only stretch the headband from the back and not to pull wear the ears are connected. Gluing them there cause the elastic in that area to no longer stretch so if you were to pull to hard the ears could come off. But for dressing up for an evening these will more than do the job and they are quite cute if I say so myself.
 This one is my Halloween wreath. I am a Halloween enthusiast! It's my absolute favorite holiday and fall is my favorite season so I go all out decorating this time of year. This wreath was super simple. Most of the supplies I already had laying around so this cost me only $1 to go buy the wreath but I will list where I got everything anyway. Alright so I got the wreath at Target in the little bargain area they usually have by their entrance but they also sell these kinds of wreaths at the Dollar Tree as well. The ribbon I already had but I bought them at Walmart for about $2 each, and then the Felt is from Walmart as well. Felt is only 23 cents a sheet and you can make about 4 roses per sheet so its very cheap. I used black, orange, and green for leaves. I simply made my felt roses which I have a tutorial posted for on here already and then I wrapped my wreath with ribbon very snug so it wont slip. Next I glued my roses in place where I wanted them to lay. Then I made a bow and tied it through a piece of the wicker and then I took another piece of ribbon and tied it through another piece of the wicker on the backside of the wreath to make sure it would lay flat again the door. Overall this was a very easy project and made a super cute wreath for the holidays that I plan to re-use for quite a while. This would also make for a cute gift.
Last but not least I made my daughter a cute little skirt. This one is a bit harder to explain, but unfortunately I do not have a video recorder to be able to post videos of tutorials, and I didn't have the time or extra hands to photograph this one.
  1.  I cut two identical rectangle strips that would be long enough in length for my 2 yr old and I sewed a seam at the bottom edges.
  2. Then I folded over about 2 inches on the top sides of the pieces. I then sewed two seams about 1/2 inch apart so there would be a casing between the two. 
  3. I sewed the lace onto the bottom. I simply just cut my lace the same length as the material and then ran a seam about a 1/4 of an inch up along the bottom edge.
  4. I cut 2 elastic strips each about 3/4 of the length of the rectangles. I then put a safety pin in the end of the elastic to make it easier to feed it through the casing. Make sure to hold onto the elastic so it doesn't disappear into the skirt. Once you have one piece fed through one side you want to sew the elastic in place and then continue the same process with your other piece of fabric.
  5. You place both of your complete pieces right side in and pin them together along the side seams. You want to sew these pieces together at an angle to get that flaired look. Simply just taper out from the top and you will get this effect. Once you have both sides sewn you can cut the excess material off to clean it up and then you're done.
  6. Flip the skirt back to right side out and the skirt is complete.

Big Things Coming

Alright so I've been busy wrapping my head around a lot of life changing things I have coming in my future. Some I'm not very happy about and others very exciting. I only wish I wasn't having to lose one of the most important parts... So in the mean time I making plans to take care of my family and prepare for my families future. I have big goals and I want to make one specific person very proud and happy to come back to what I will have built for them. With that being said I still have a few things to get arranged and set it stone before announcing my exciting news but everyone should be very excited. I will probably be releasing the news within the next few weeks. Keep your eyes peeled.

Thursday, September 20, 2012

Felt Rose Tutorial

Felt Roses are one of the easiest flowers to make. They're cute on wreaths, head bands, make cute hair clips etc... So here's how it's done. And sorry my pictures aren't the best and I could've included a little more detailed step by step but these will have to do because I had no one to help with the photography part.

FELT ROSES
Materials Needed:
  1. Felt
  2. Hot glue gun
  3. Hot glue sticks
  4. Scissors 
 
 Directions:
  1. Cut a circle out of your felt. It doesn't need to be perfect and it can be whatever size you want as well.
    After you've cut your circle cut a spiral into it. As you can see I pre-cut a bunch of felt into different sizes for varied size flowers, this makes it easier to work through them faster versus doing them one by one.
2. You start your flower from the smaller pointed side. You will put about an inch long bead of hot glue from the point in along the bottom edge of the felt. Then you will fold the pointed edge into the glue.
3. Once your point is folded in you will continue to roll your felt like so in the picture below. I lay down about an inch of hot glue at a time so I can turn a full circle of petals before having to glue again.

 4. You will continue this process through all the material. You can get creative and make the petals look more unique as you go by folding the edges over and hot gluing them down as well, this gives it a little more realistic look and hides some of the raw edges. Although you don't really have to worry about raw edges with felt since it stays together but you will want to make sure you have decent scissors you're cutting with or it does mangle the felt.

 This is another technique I use to get more of a realistic look in my flowers. I lay down an inch of glue and then before laying the petal down I pinch part of the felt together let that dry for a second and continue to lay down the rest of the glued area.

 Here's another view on the pinched effect above. Make sure to let it dry before moving on or it falls apart.

 Continue all the steps and keep rotating your flower. Feel free to jump back and forth between the different folds as well. That is what I did in this flower.

 5. Once you have come to the end of your spiral where the round circle part is you will cover it in hot glue. This closes in the bottoms and also gives an extra layer of glue to all your petals so they don't fall apart. Press the glued circle into the bottom of the flower and let dry.

 It will look something like this when you are done. If any pieces feel loose you can easily go back at this time and put dabs of glues in areas where you feel it's needed.

 6. This step is optional depending if you want leaf petals or not. I took a scrap piece of green felt and cut leaf shapes out. Once again they don't have to be perfect, I free handed mine.

 This is what my leaves look like. I went with three, that's how many I usually put on my flowers. I always like an odd amount of leafs.

 7. Find the placement for your leaves and the glue them to the bottom of your flower. I just put on dot of hot glue on the tip of my leaf because you don't want it to spill over and onto your flower petals.

 And this is how the flower turns out in the end. I use my flowers for various things such as hair clips for little girls or I put them on holiday wreaths... They're cute and can go on just about anything and they only take about 10 minutes.

Tuesday, September 18, 2012

Indians & Cowgirls

Ok so as seen in my last posts I made my oldest an Indian costume for Halloween. So to go along with it I decided to dress my infant as the cowgirl. This costume was also cheap and easy to make.

Materials:
1. Long sleeve onesie (Walmart for $3)
2. Two red bandanas (Walmart for $2)
3. Blue filigree embossed felt and yellow felt (Walmart $3)
4. White ruffle (Walmart $3)
5. Hat (Build-a-bear $5)
6. Hot glue gun
7. Hot glue sticks
8. Sewing machine
9. Black puffy paint
10. Elastic

*Note previous to making this costume I already owned a lot of the things needed to make this costume, so it's possible it could cost you a lot more than it did for me.

How to make costume:

1. I cut out the sheriff star (actually my husband did, he was stoked to hep with the costumes) and wrote the name with puffy paint so it could dry.
2. I cut out the vest pieces. I simply laid my felt down on the indie and eyeballed it and once I had one side cut I reversed it and placed it down on the felt and re-cut the exact same shape.
3. I hot glued the vest down. I tucked the top of the vest under the shoulder caps on the onesie so it'd still be easy to get the baby in and out of it. The I hot glued the sheriff badge to the vest. After everything was set I used puffy paint to make stitch lines around the edge of the vest for extra detail. Then set this aside to dry, this piece of the costume is done.
4. I unfolded one of my bandanas and cut right along the already existing crease (the longest one) giving me two matching rectangles.
5. I folded down the cut/raw edge about an inch and pinned it. Do this on both pieces. Then sew a seam about a 1/4 inch in all the way across and about a 1/4 inch down sew another seam parallel to the one before. Make sure you are back stitching at the beginning and end to make sure your piece holds together. Do this two both pieces.
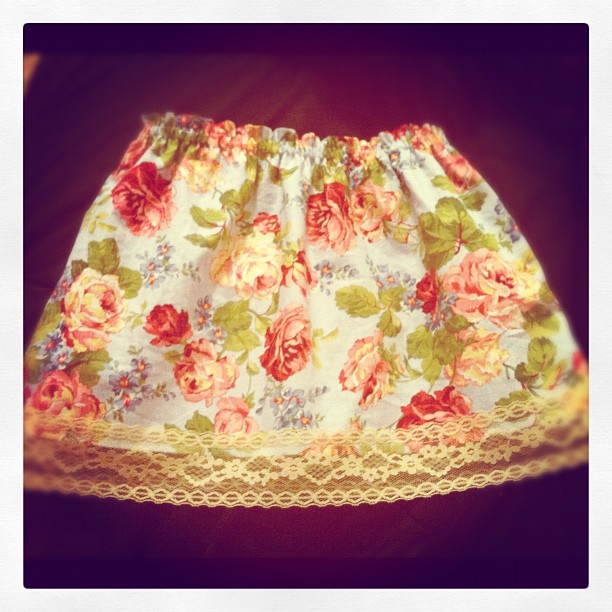
6. This is where you add the ruffle. Cut two strips the length of each bandana pattern. Then pin the along bottom edge of each piece of your skirt. See each ruffle to skirt.
7. Depending on size of child cut a strip of elastic to now feed through the lining you just made. For my infant I chose to go with elastic about 2/3 of the length of the bandana strip. Make sure to cut one strip of elastic for each side. Then stick of safety pin in the end of your elastic strip (this makes it easier to feed through) and feed elastic through casing. Make sure not to let go of ends or your elastic will disappear into the casing. Once I finished this part I did a quick stitch going through each side of the elastic vertically to hold them in place. Do this to both pieces of bandana.
8. Match skirt pieces up facing right side in. Pin each side about an inch in evenly down the sides. Then sew a zig zag stitch straight down the sides making sure to back stitch at the top and bottom and making sure to run through the elastic as well. Do this to both sides.
9. Trim up excess material and strings hanging but make sure not to cut to close so you don't cut material or stitching. Turn inside out and ta-da! Your skirt is done.
10. Take your second bandana and cut one of the corners off. I eyeballed mine at what I thought would be big enough to tie like a bib around my daughter. Then fold over raw edge and sew a seam.

And your costume is all done! Easy as that! So here's how it came out!


Monday, September 17, 2012

Toddler Indian Costume

Alright so I got the head band done this evening and was able to trick my daughter into taking some cute pictures by bribing her with red vines, haha! So here's what the costume looks like on, and man am I pleased. I'm so excited for Halloween!

Thursday, September 13, 2012

Fairytales & Fables

Ok so I've been working on a set that I want to paint. I'm doing a set on fairytales and fables. But I'm doing these in my own version. A more adult take on them I guess you could call it. So far I have only gotten a few faces drawn for two of them. I will be painting these when I get them all done and selling them as a set.
Anyway here's a sneak peak of what I have going on.