Wednesday, November 28, 2012

Friday, October 19, 2012

Some Catch Up

I've been super busy as of lately and been doing quite a bit of traveling so I've had very little time to post on some of the things I've made lately. So to do a little catch up here's a few photos of some of the things I've been doing.
 This one is a head band I made for my niece. She's going to be a cat for Halloween and as you can tell she's still a newborn. So for this I just used a black Infant stretch head band and then I used felt to make ears and a bow and I simply hot glued them to the headband. The only thing with making it this way is you have to be careful to only stretch the headband from the back and not to pull wear the ears are connected. Gluing them there cause the elastic in that area to no longer stretch so if you were to pull to hard the ears could come off. But for dressing up for an evening these will more than do the job and they are quite cute if I say so myself.
 This one is my Halloween wreath. I am a Halloween enthusiast! It's my absolute favorite holiday and fall is my favorite season so I go all out decorating this time of year. This wreath was super simple. Most of the supplies I already had laying around so this cost me only $1 to go buy the wreath but I will list where I got everything anyway. Alright so I got the wreath at Target in the little bargain area they usually have by their entrance but they also sell these kinds of wreaths at the Dollar Tree as well. The ribbon I already had but I bought them at Walmart for about $2 each, and then the Felt is from Walmart as well. Felt is only 23 cents a sheet and you can make about 4 roses per sheet so its very cheap. I used black, orange, and green for leaves. I simply made my felt roses which I have a tutorial posted for on here already and then I wrapped my wreath with ribbon very snug so it wont slip. Next I glued my roses in place where I wanted them to lay. Then I made a bow and tied it through a piece of the wicker and then I took another piece of ribbon and tied it through another piece of the wicker on the backside of the wreath to make sure it would lay flat again the door. Overall this was a very easy project and made a super cute wreath for the holidays that I plan to re-use for quite a while. This would also make for a cute gift.
Last but not least I made my daughter a cute little skirt. This one is a bit harder to explain, but unfortunately I do not have a video recorder to be able to post videos of tutorials, and I didn't have the time or extra hands to photograph this one.
  1.  I cut two identical rectangle strips that would be long enough in length for my 2 yr old and I sewed a seam at the bottom edges.
  2. Then I folded over about 2 inches on the top sides of the pieces. I then sewed two seams about 1/2 inch apart so there would be a casing between the two. 
  3. I sewed the lace onto the bottom. I simply just cut my lace the same length as the material and then ran a seam about a 1/4 of an inch up along the bottom edge.
  4. I cut 2 elastic strips each about 3/4 of the length of the rectangles. I then put a safety pin in the end of the elastic to make it easier to feed it through the casing. Make sure to hold onto the elastic so it doesn't disappear into the skirt. Once you have one piece fed through one side you want to sew the elastic in place and then continue the same process with your other piece of fabric.
  5. You place both of your complete pieces right side in and pin them together along the side seams. You want to sew these pieces together at an angle to get that flaired look. Simply just taper out from the top and you will get this effect. Once you have both sides sewn you can cut the excess material off to clean it up and then you're done.
  6. Flip the skirt back to right side out and the skirt is complete.

Big Things Coming

Alright so I've been busy wrapping my head around a lot of life changing things I have coming in my future. Some I'm not very happy about and others very exciting. I only wish I wasn't having to lose one of the most important parts... So in the mean time I making plans to take care of my family and prepare for my families future. I have big goals and I want to make one specific person very proud and happy to come back to what I will have built for them. With that being said I still have a few things to get arranged and set it stone before announcing my exciting news but everyone should be very excited. I will probably be releasing the news within the next few weeks. Keep your eyes peeled.

Thursday, September 20, 2012

Felt Rose Tutorial

Felt Roses are one of the easiest flowers to make. They're cute on wreaths, head bands, make cute hair clips etc... So here's how it's done. And sorry my pictures aren't the best and I could've included a little more detailed step by step but these will have to do because I had no one to help with the photography part.

FELT ROSES
Materials Needed:
  1. Felt
  2. Hot glue gun
  3. Hot glue sticks
  4. Scissors 
 
 Directions:
  1. Cut a circle out of your felt. It doesn't need to be perfect and it can be whatever size you want as well.
    After you've cut your circle cut a spiral into it. As you can see I pre-cut a bunch of felt into different sizes for varied size flowers, this makes it easier to work through them faster versus doing them one by one.
2. You start your flower from the smaller pointed side. You will put about an inch long bead of hot glue from the point in along the bottom edge of the felt. Then you will fold the pointed edge into the glue.
3. Once your point is folded in you will continue to roll your felt like so in the picture below. I lay down about an inch of hot glue at a time so I can turn a full circle of petals before having to glue again.

 4. You will continue this process through all the material. You can get creative and make the petals look more unique as you go by folding the edges over and hot gluing them down as well, this gives it a little more realistic look and hides some of the raw edges. Although you don't really have to worry about raw edges with felt since it stays together but you will want to make sure you have decent scissors you're cutting with or it does mangle the felt.

 This is another technique I use to get more of a realistic look in my flowers. I lay down an inch of glue and then before laying the petal down I pinch part of the felt together let that dry for a second and continue to lay down the rest of the glued area.

 Here's another view on the pinched effect above. Make sure to let it dry before moving on or it falls apart.

 Continue all the steps and keep rotating your flower. Feel free to jump back and forth between the different folds as well. That is what I did in this flower.

 5. Once you have come to the end of your spiral where the round circle part is you will cover it in hot glue. This closes in the bottoms and also gives an extra layer of glue to all your petals so they don't fall apart. Press the glued circle into the bottom of the flower and let dry.

 It will look something like this when you are done. If any pieces feel loose you can easily go back at this time and put dabs of glues in areas where you feel it's needed.

 6. This step is optional depending if you want leaf petals or not. I took a scrap piece of green felt and cut leaf shapes out. Once again they don't have to be perfect, I free handed mine.

 This is what my leaves look like. I went with three, that's how many I usually put on my flowers. I always like an odd amount of leafs.

 7. Find the placement for your leaves and the glue them to the bottom of your flower. I just put on dot of hot glue on the tip of my leaf because you don't want it to spill over and onto your flower petals.

 And this is how the flower turns out in the end. I use my flowers for various things such as hair clips for little girls or I put them on holiday wreaths... They're cute and can go on just about anything and they only take about 10 minutes.

Tuesday, September 18, 2012

Indians & Cowgirls

Ok so as seen in my last posts I made my oldest an Indian costume for Halloween. So to go along with it I decided to dress my infant as the cowgirl. This costume was also cheap and easy to make.

Materials:
1. Long sleeve onesie (Walmart for $3)
2. Two red bandanas (Walmart for $2)
3. Blue filigree embossed felt and yellow felt (Walmart $3)
4. White ruffle (Walmart $3)
5. Hat (Build-a-bear $5)
6. Hot glue gun
7. Hot glue sticks
8. Sewing machine
9. Black puffy paint
10. Elastic

*Note previous to making this costume I already owned a lot of the things needed to make this costume, so it's possible it could cost you a lot more than it did for me.

How to make costume:

1. I cut out the sheriff star (actually my husband did, he was stoked to hep with the costumes) and wrote the name with puffy paint so it could dry.
2. I cut out the vest pieces. I simply laid my felt down on the indie and eyeballed it and once I had one side cut I reversed it and placed it down on the felt and re-cut the exact same shape.
3. I hot glued the vest down. I tucked the top of the vest under the shoulder caps on the onesie so it'd still be easy to get the baby in and out of it. The I hot glued the sheriff badge to the vest. After everything was set I used puffy paint to make stitch lines around the edge of the vest for extra detail. Then set this aside to dry, this piece of the costume is done.
4. I unfolded one of my bandanas and cut right along the already existing crease (the longest one) giving me two matching rectangles.
5. I folded down the cut/raw edge about an inch and pinned it. Do this on both pieces. Then sew a seam about a 1/4 inch in all the way across and about a 1/4 inch down sew another seam parallel to the one before. Make sure you are back stitching at the beginning and end to make sure your piece holds together. Do this two both pieces.
6. This is where you add the ruffle. Cut two strips the length of each bandana pattern. Then pin the along bottom edge of each piece of your skirt. See each ruffle to skirt.
7. Depending on size of child cut a strip of elastic to now feed through the lining you just made. For my infant I chose to go with elastic about 2/3 of the length of the bandana strip. Make sure to cut one strip of elastic for each side. Then stick of safety pin in the end of your elastic strip (this makes it easier to feed through) and feed elastic through casing. Make sure not to let go of ends or your elastic will disappear into the casing. Once I finished this part I did a quick stitch going through each side of the elastic vertically to hold them in place. Do this to both pieces of bandana.
8. Match skirt pieces up facing right side in. Pin each side about an inch in evenly down the sides. Then sew a zig zag stitch straight down the sides making sure to back stitch at the top and bottom and making sure to run through the elastic as well. Do this to both sides.
9. Trim up excess material and strings hanging but make sure not to cut to close so you don't cut material or stitching. Turn inside out and ta-da! Your skirt is done.
10. Take your second bandana and cut one of the corners off. I eyeballed mine at what I thought would be big enough to tie like a bib around my daughter. Then fold over raw edge and sew a seam.

And your costume is all done! Easy as that! So here's how it came out!


Monday, September 17, 2012

Toddler Indian Costume

Alright so I got the head band done this evening and was able to trick my daughter into taking some cute pictures by bribing her with red vines, haha! So here's what the costume looks like on, and man am I pleased. I'm so excited for Halloween!

Thursday, September 13, 2012

Fairytales & Fables

Ok so I've been working on a set that I want to paint. I'm doing a set on fairytales and fables. But I'm doing these in my own version. A more adult take on them I guess you could call it. So far I have only gotten a few faces drawn for two of them. I will be painting these when I get them all done and selling them as a set.
Anyway here's a sneak peak of what I have going on.


Baby Costumes

So I'm making my girls their costumes this year because most costumes are so outrageous in price and are so cheaply made. Plus when I was a girl my mom made all my costumes and I loved it, So it's definitely a tradition I'm looking forward to carrying on with my girls. I chose to do an Indian and Cowgirl this year because my husband and his sister have a childhood photo of them as an Indian and Cowgirl for Halloween when they were young and I thought it'd be cute to replicate their costumes. So far I have gotten the dress done for the Indian costume with my older daughter will be wearing. It was very easy to make and I spent under $10 for my materials. Mind you I had a few things before making the costume such as a sewing machine, thread, hot glue gun, hot glue sticks, and ribbon which could make your project more expensive if you don't already own them.

For this project I purchased:
  1. Brown fleece- which only cost $2.47 a yard from wal-mart. I chose to go with this material since it tends to be a bit colder during Halloween.
  2. Felt- which cost 23 cents a piece. I used brown and red for the detail on the neck line. Which with the felt all I used to apply the pieces together and onto the dress was hot glue.
  3. Fringe- I got the fringe from wal-mart for $2.50 and i sewed that part onto the dress to make sure it was secure.
  4. Ribbon- I used black and turquoise ribbon for the design around the neckline and along the fringe on the bottom of the dress to give it a little more detail.

Steps to making the dress:
  1. Step one, I used a dress that fits my daughter as a reference to cut out the material. I cut out the front and back shapes. Dipping in a little bit on the front piece so the neck line wouldn't be to tight. When you're cutting out the shapes along your dress reference don't worry about cutting them directly up against the dress. It's probably better if you leave an extra inch all the way around your pattern because you will lose some of it sewing your dress together.
  2. Step two, I sewed the zipper into the back pattern of the dress. I cut a slit directly down the middle of the back the length of the zipper. Then I pinned the zipper with the material folded in a bit so there wont be an ugly seam hanging around the zipper. Once my zipper was pinned I sewed it down. Most of you probably already know this but if you're new to sewing make sure at the beginning and end don't forget to back stitch so your seams do not come undone.
  3. Step three, I sewed my exposed edges of the dress. This would be the bottom of the front and back pattern, the neckline and the arm holes. Don't worry about the tops of the sleeves or sides of the dress yet cause that will be taken care of when you sew the patterns together. 
  4. Step four, My dress has a zig zag pattern sewed into the front and back just for a little extra design. It's very hard to see it in these pictures but if you choose to do that design now is the time for that. All I did was freehand zig zags across the whole front and back patterns along the bottom.
  5. Step five, I made my design for the neck line. I cut out the shape I wanted on my neckline with the brown felt and then I used ribbon and hot glued my first design down. Then I cut out triangles also felt and glued those in between my ribbon. 
  6. Step six, I hot glued all my pieces that were being attached to the dress. First I did the neckline. My pattern was already made so all I had to do was glue it down along the neck line. I left the bottom of the pattern open to glue down last because I was tucking fringe underneath the bottom. So this is when the fringe goes in and I hot glued this piece of fringe since it was going to be covered with the pattern anyway. Once my fringe was in place I glued down the rest of the pattern and then I used a piece of black ribbon to hide the seams and glued that over the top. After this was done I glued my turquoise ribbon to the bottom of the dress right above the fringe. 
  7. Step seven, Sew the front and back pieces together! Place your pieces right side in and pin the dress down the sides about a 1/4 inch in sew down the sides making sure to back stitch at the top and bottom so your dress doesn't come apart. After the sides you will do the same thing with the straps at the top.   
  8. Step eight, Lastly after the dress was all done I used orange puffy paint and added the dots on the neckline pattern. Make sure to do this step last so the dress can sit and dry for a good couple of hours.
This dress was very easy and fun to make. I'm in no way a great sewer. I teach myself mostly everything I know or have picked it up from watching my mom when I was a kid. If you can work a sewing machine and know how to use a hot glue gun you can make this dress.
I still have a headband and bow and arrow to make as well. I will be posting more pictures in a couple days when I have everything together and actually on my little girl so you can get an idea of what it looks like.
 

Catch Up!

So I'm finally playing catch up. This last week I've been busy with my kids and redoing my blog I haven't had much time for posts. But a little later today I will be posting latest projects and ideas. I went and go a notebook the other day so all my projects could be a little more organized since I'm always losing the loose sheets of paper I jot them down on! It's helping me prioritize the order of things I want to get done first because I have a terrible habit of doing 100 projects at the same time. This last week I started on my girls costumes for Halloween. My oldest is going to be an Indian and the youngest a cowgirl. So far I got the dress done for the Indian costume done and will be posting pictures of it later so keep your eyes posted.

Tuesday, August 28, 2012

A new adventure

Starting a new journey!

Alright so I recently got a new camera (Canon EOS 40D)! I got the camera mainly to shoot photos of my daughters and tattoos that my husband and myself do! This is my first Digital SLR, so I've been reading up on tips and tricks, bought a basic lens that I can already tell I will grow out of quickly but as with anything else I did not want to jump in head first into something I do not know, I'd rather learn the proper way. I LOVE the camera and am very excited to get started with my photography adventures. As I get better and obtain more knowledge I plan to eventually pursue shooting weddings and children. I absolutely love the two subjects for photography. Especially being that I make things for weddings and for children as well. So that being said here are a few photos I went out and took today. 


And an update on the daily DIY craft!

My niece turned 3 this week and she has just about every toy known already so I wanted to do something different. I decided to make her a hair accessory holder/ hair accessories. This DIY project was extremely inexpensive and simple to make.
Materials used:
  1. Oatmeal Can- I used a basic Acrylic paint and painted the outside, I did about 3 coats to make sure all logos were no longer visible.
  2. Candlestick Holder- I found a clear candlestick holder at the Dollar Tree
  3. Glue- I went with Epoxy because I wanted to make sure it was sturdy.
  4. Paint/Brush- Acrylic Paint and an old brush
  5. Elastic- Two Elastic Strips ran down the sides, used to clip all the hair clips on to.
  6. Hair Accessories- You can choose to make them or buy them.
Here's the final Product, and I chose to make my hair accessories.
I used my girls as models for some of the accessories.


Monday, August 13, 2012

Unfinished Business

A little behind with my blog, sorry.
The trip to Arizona went great. Got to do some fun tattoos, spend personal time with my family, see old friends, and ordered myself a new lens, and the hubby a bishop rotary. I'm very anxious to get my camera up and running and start messing around with it, as well as be able to take much nicer photos of my tattoos. I also got the chance to try out a rotary yesterday and I must say I did love it, the color just went in so smoothly, it's gentle on the skin, and boy was the thing damn near silent! Anyways here's a few pictures of the piece I used the rotary on. It is half healed/half fresh. I was very excited to finish this piece I started on my husband almost a year ago, so here it is!

Wednesday, August 1, 2012

Wipe Case Tutorial

Baby Wipes Case

Alright so I spent the day working on a few DIY reusable wipes cases. They're super easy to make, save space in your bag, still look cute, and get the job done. This is one of my first tutorials so excuse the horrid picture taking skills.

Things you will need:

  1. Your choice of material
  2. Hot glue and hot glue gun
  3. Your choice of a 3/8 inch ribbon
  4. A huggies wipes case (I prefer this case because it isn't flimsy)
  5. Scissors
Step One: You want to cut out two pieces of material. It does not need to be precise because you will be coming back and trimming excess material off anyway. The easiest way to do it is just set the case on top of the material and roughly cut around it.
Step Two: Make sure your material doesn't have a bunch of creases in it or it will not look as clean. I take the creases out of my with my flat iron. You can use a regular iron as well but I find this easier with such a small piece of material and you don't have to pull out an ironing board.
 Step Three: Once you have your two pieces of material cut out it's time to glue them down. You're going to apply the hot glue in the crease of the case where I am pointing to. If you go much lower it will make it difficult to trim the material later. You want to start applying the hot glue on one of the smaller sides first. You will apply the glue and immediately place your material to it. Then you want to go with the side directly across from it and apply the glue again and then stretch the material lightly pulling it nice and tight and place the material down. Then you will proceed to do the same process with the other sides.

 Step Four: Once you have the material placed you will have excess material hanging. You can take your scissors and trim the material off. You want to cut it enough that it does not hang of the edge but don't worry about it looking perfect because its going to be covered with more glue and then your 3/8 inch ribbon anyways.
 Once you trim the material off it will look similar to this. As you can see it isn't perfect but it will be covered with ribbon so no need to be a perfectionist.
 Step Five: Once your material is glued down you are going to take out your ribbon and measure it around your case carefully to get it the exact size you are going to need it. You will cut two pieces of the same size ribbon to use for your trimming. Then you will glue them down. It doesn't matter if you start with top or bottom but you want to start gluing the ribbon down on the back in the middle so when you finish gluing the ribbon it finishes in the back as well and you don't see any seams in the front.
 Once you are finished your case should look something like this. Sorry for my rough tutorial Haha!


Sunday, July 29, 2012

Mother by day. Tattooer by night.

Mommy's Little Monsters

So for those of you who don't know. I recently had my second daughter about 2 months ago. That being said I have been tattooing a lot less than usual. I take care of two little girls full time and tattoo during the few spare hours I can squeeze by. My children do not attend any sort of day care, I am a tattooer not a doctor I can't afford that shit, haha. So for those of you whole are loyal clients or new ones waiting for their turn, THANK YOU! It means a lot, and once my youngest gets a bit older I should be able to get back to a regular schedule. Also if you're from Arizona, always keep a look out for my posts on here or facebook reguarding guest spots and trips home. Especially if you have any unfinished pieces. Please lets get those finished before we start a million new ones. 

On that note,
I spent my day with my husband and my girls. I got the girls all dolled up for their first sister photos. Well nice ones, haha.
Here's how they came out!


Sunday, July 22, 2012

Our Wedding

So my husband John Spring and I finally tied the knot a few weeks ago on June 30th. Being that we paid for our own wedding and have two little girls we definitely budgeted on a lot of things. So I spent a lot of time on pinterest and crafting for our DIY wedding. I made everything including signs, centerpieces, candles, pomanders, a card box, bride and groom silhouettes, our cake, and the photobooth and ceremony back drops. I purchased just about everything from the dollar store or walmart.
 My Bouquet- Dollar store flowers and coffee filter flowers I made. Total cost approx. $5
Mason Jar Candles- Mason jar 12 pack from walmart, paper doily's, ribbon, and tea lights from the dollar store. Total cost approx. $15
 Votive Candles- 18 votive candles from dollar store and a roll of lace ribbon from walmart. Total cost approx. $20
 Tall Candles- 4 candles, brown paper, paper doily's, and ribbon from dollar store. Total cost approx. $7
 Flower Vases- Vases from thrift store and flowers from dollar store. Total cost approx. $6
 Silhouettes- Wood Plaques from dollar store and acrylic paint from walmart. Total cost approx. $3
 Wedding Favors- Brown lunch bags, paper doily's from the dollar store, mini clothes pins from walmart, and 46 Cuzzi's from oriental trading. Total cost approx. $50
 Ceremony Backdrop- Burlap from walmart, tulle from michaels, pomanders I made with coffee filters, and a personalized chalkboard sign. Total cost approx. $15
 Photobooth Backdrop- Burlap from walmart, chalk board from hobby lobby, tulle from michaels, lights from target, and a coffee filter garland strand I made. Total cost approx. $40
Cake and Drink Stands- Composed from a lot of the things you see above and food made by me and my mother.
Silverware Settings- Realistic looking plastic silverware, paper doily's from the dollar store, twine from walmart. 100 settings. Total cost approx. $30
 Tableware- Plastic table cloth and plastic ceramic look a like plates, clear cups, gold place mats from party city. 100 settings. Total cost approx. $150
 Chalkboard Signs and Cardbox- Pieces of wood, wood box from hobby lobby, chalk from walmart, coffee filter flowers I made. Total cost approx. $13
Personalized Chalkboard Sign- Wood from hobby lobby, chalkboard paint, and chalk from walmart. Total cost approx. $8


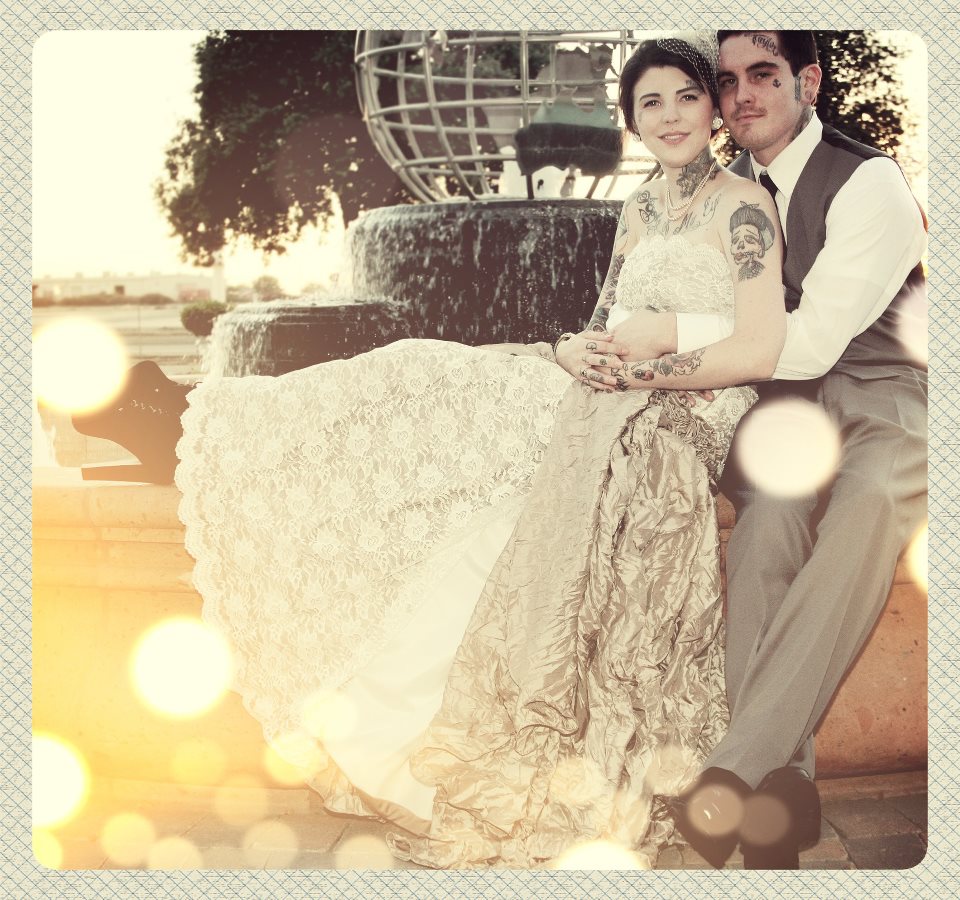
 And even though you're always told to never order a dress offline, from another country, or without trying it on first... I did it anyway. I seen a dress on pinterest I thought was perfect but there was no link to the original site, so I thought the dress would never be an option and I would be on the hunt again. Well I was searching through a whole sale site from China (which I know is a no no, but I was on a budget) and 14 pages in there was the dress I had seen. Next I look at the price thinking it would never be in my price range... well it ended up only being $136.00! I couldn't believe it, the dress was mine! BUT, I was 8 months pregnant (I know I picked the best way to go about all of this, haha) so I was guessing on a dress size and hoping for the best when I ordered it. The way I saw it though was if it really didn't end up working out I only lost like a third of the price every other girl wastes on their entire dress. The dress came and it was everything I hoped for but in the pictures you could not see all the ugly little sequences on the top which made it look like a prom dress. Lucky for me though my mother is a great sewer so we went out and bought some lace (which I really wanted on my dress anyway) and she sewed lace over all the problem areas. A month later I had my second daughter and I tried the dress on for the first time 3 weeks before my wedding and it fit!! Everything had just worked in my favor and it was great, I couldn't have been happier. This is how it turned out!


These four were some of the professional photos we had done by Dylan Coffey Photography, a friend of ours. And then I ran them through an app on my phone called PicFX.
 My lovely dress.
 My handsome husband Mr. Spring!
 The Spring family!
 My gorgeous Mother and Daughters!
 These are all a few shots of how our photobooth turned out. I'd say it was truly the best idea of all. It's so much better and more personal than a typical guestbook that everyone just signs. It made for great laughs as you can tell by what some people wrote, haha. And we can look back and see all of our guests and remember how much fun we were all having!

All in all we probably spent a total of $1800 altogether for our wedding. That's including all attire, the venue, decorations, tableware, and food. And in my opinion I thought my wedding looked and turned out great and I didn't have to have a lot of money to pull it all off! Hope you enjoy and maybe even grab a few ideas to make your wedding happen! <3